Showing posts with label crochet. Show all posts

Tuesday, August 19, 2014

Crochet for Cancer: Free Beanie Pattern

As part of our One Book-One School Initiative, we read The Fault in Our Stars. Our school will be doing various activities centered around the book.  I was approached to help student crochet items to donate to cancer patients.  This led me to discover a charity called Crochet for Cancer.  I wrote this basic pattern (which I actually use as the base for many of the patterns in my shop) to share with my students.

I've decided to share it with the community at large in hopes that it will be used for more donations.  If you use this pattern for hats you sell, please give me credit and provide a link to this pattern.  

If you choose to donate caps, guidelines are proved here along with contact information for making your donation.  They also have a large collection of free chemo cap patterns.

Erma’s Inspiration Basic Double Crochet Beanie for all sizes

Size
Height in inches
Circumference in inches
Newborn (0-3 months)
5.5-6
12-15
3-6 months
6.5-7
14-17
6-12 Months
6.5-7.5
16-19
Toddler
8
18-20
Child
8.5
19-20.5
Teen/Adult Female
9-10
21.5-22.5
Teen/Adult Male
10
23-24                          
Supplies
H-Hook
Worsted Weight Yarn

Abbreviations
DC- double crochet
SC- Single Crochet
CH-chain
SL ST- Slipstitch
STS- stitches


1.        Begin by making a magic circle.  Chain 3, 10 DC in ring. Pull magic ring tight SL ST into top of CH 3 (10 STS)
a.       There are tutorials on YouTube for a magic ring if you are unfamiliar or you can:
CH 4.  SL ST into 1st CH.  CH3, DC 10 in ring, SLST into top of CH 3
Here's a tutorial for the Magic Circle using Double Crochet, this tutorial is a little better             BUT she is using single crochet
2.       CH3, 2 DC in each DC.  SL ST into top of CH 3 (20 STS)
3.       CH 3. [2 DC in next DC, DC in next DC] repeat to end. SL ST into top of CH 3  (30 STS)
4.       CH 3. [2 DC in next DC, DC in next 2 DC] repeat to end. SL ST into top of CH 3 (40 STS) For Newborn size skip to #9
5.       CH 3. [2 DC in next DC, DC in next 3 DC] repeat to end. SL ST into top of CH 3  (50 STS) For 6-12 month skip to step #9
****FOR 3-6 MONTH SIZE ONLY CH 3 [2 DC  in next SC, DC in next  9DC] repeat to end. SL ST into top of CH 3.  (55 STS) skip to step #9****
6.       CH 3. [2 DC in next DC, DC in next 4 DC] repeat to end. SL ST into top of CH 3 (60 STS) for Toddler size skip to step #9
****FOR CHILD SIZE ONLY CH 3. [2 DC in next DC, DC in next 11 DC] repeat to end. SL ST into top of CH 3 (65 STS) skip to step #9****
7.       CH 3. [2 DC in next DC, DC in next 5 DC] repeat to end. SL ST into top of CH 3 (70 STS)  for Teen/Adult Female size skip to step #9
8.       CH 3. [2 DC in next DC, DC in next 13 DC] repeat to end. SL ST into top of CH 3 (75 STS) (Only for Teen/Adult Male)
9.       CH3, DC in each DC around. SL ST into top of CH 3. Repeat until the proper number of rows is achieved. 
a.       For Newborn- repeat 6 times  for a total of 10 rows
b.      For 3-6  months-repeat for a total of 11 rows
c.       For 6-12 months- repeat 7 times for a total of 12 rows
d.      For Toddlers- repeat 7 times for a total of 13 rows
e.      For Children- repeat 7  times for a total of 14 rows
f.        For Teen/Adult Females- repeat 8 times for a total of 15 rows
g.       For Teen/Adult Males- repeat 8 times for a total of 16 rows
*always measure to make sure your hat falls into the proper size range. See Size chart at the top of pattern

10.   CH 1.  SC in each DC around. SLST into CH1.  Tie off and weave in ends.

Optional: Change colors during row changes for stripes.  Embellish with appliques.  

Here are some examples of hats I've created using this pattern: 

Sunday, October 20, 2013

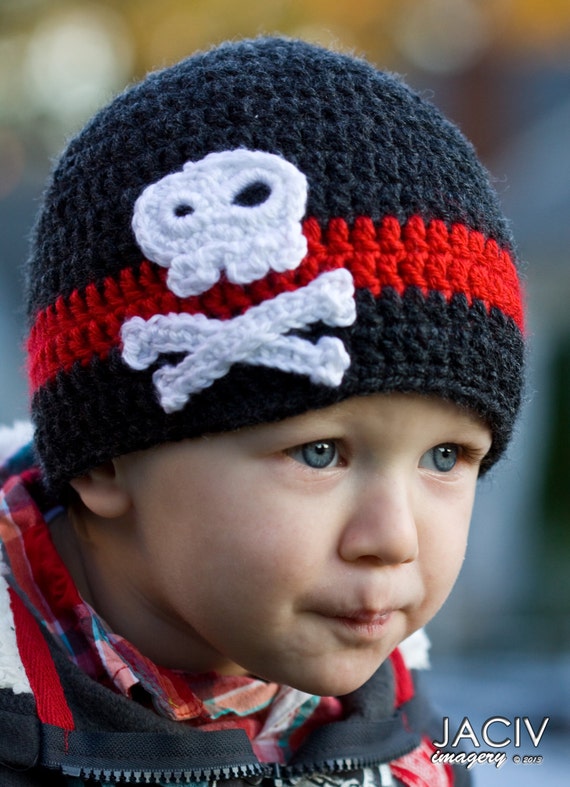
Skull and Crossbones hat inspired by Jake and the Neverland Pirates

I'd been feeling some mom-guilt as I was finishing my orders this weekend, when suddenly I was inspired by my son's outfit choice.  He LOVES Jake and the Neverland Pirates (on Disney Junior), so when I asked him what he wanted to wear Saturday morning, of course he said Jake--meaning his one short sleeved (aka not appropriate for the weather) shirt cover with Jake and pirate motif.  So I layered it over a striped thermal and we went about our business.  

 After I put the final stitches on yet another Yoda hat, I wanted to make him something.  He loves wearing the Yoda Hats I make but I've yet to make one for him to keep, but then I noticed the skull and crossbones on J's shirt.  I thought, I could do that! But how?
 Then I remembered I'd pinned a skull applique a while back.  


The applique from Josh's Jake shirt is a bit different; the eyes are uneven, there's no nose, and the teeth are only the top set.  But it gave me a great idea about how to start.  In fact, I'd highly recommend that pattern to beginners compared to the pattern I am debating about whether to share.  Oh and I absolutely agree with the blogger--Caron Simply Soft Yarn is a great choice for appliques, of course I have it on hand, so that's what I used.  The crossbones were simple 10 single crochets with 2 picots at each end.

Then I followed my trusty beanie pattern, using Vanna's Choice Dark Heather Gray for most of the body and Scarlet for the stripe on the 11th and 12th row.
 I stitched on the applique carefully crossing the bones at just the right point.


Then I begged my brother to take some decent pictures.


Click here to see the listing on Etsy


Tuesday, August 27, 2013

My Nephew's Newborn Business Suit

My cousin ("nephew" is her son) shared a picture with me in June of a baby with a necktie and asked if I could make one.  I created this set and gave it to my cousin at her shower on Sunday.

The hat is based on a free pattern I found on Ravelry  before Joshua was born.  I had the printed directions from ages ago so I'm unable to link the exact pattern.  I wrote my own pattern for the diaper cover for Joshua's newborn photoshoot.  After looking at a few free patterns on the internet that were free, I decided I could do better if I wrote my own pattern for the tie.  I really wanted that authentic tie triangle look.

Now we wait for the adorable pictures of Nathan the business man to come!

Sunday, August 18, 2013

Free Old Fashioned Flower Crochet Pattern

 I was reorganizing my crafts board on pinterest and came across this inspiration I'd pinned a while back. Unfortunately the link was broken and there was no pattern. I liked it enough to write my own patters.  I write a lot of patterns for what I carry in my etsy shop, but I don't share them or sell them for now.  I figured I probably won't sell this pattern since someone else created it, so time to payback the crochet world for all the awesome free crochet patterns I've found.  Here is what I came up with. 
My creation
The petals on my old fashioned flower are a bit more distinct, but I like it that way.  What do you think? 

Here's the pattern along with pictures of each step.  

I used three colors, a G Hook, and Caron Simply Soft Yarn. 

Step 3: The wagon wheel becomes a hexagon
    Steps 1 & 2 make a wagon wheel
    with 6 spokes of 2 DC each
  1. With color one Ch 4.  Join with a slip stitch to form loop.
  1. Slip stitch into loop.  Ch 3.  DC. Ch1,  [2 DC, CH 1] 5 times.  Slip Stitch into top of Ch 3.  Tie off Color 1.
  2. Join Color 2 in any CH 1 space.  CH3 DC, CH1, 2DC all in first chain 1 space.  [2DC, CH 1, 2DC] in the five remaining CH 1 spaces.  Slip stitch into top of CH 3 to join.
  3. Slip stitch in next stitch,[slip stitch into CH 1 space, CH 2, 6 DC, CH 2, Slip stitch into same CH 1 space, Slip stitch in next three stitches] 6 times.  Tie off color 2.
Now it's starting to look like a flower!
5.  With Color 3, Join by single crocheting  into the top of the first(rightmost) CH 2 of any petal. * SC in next 6 stitches of petal.  Skip CH 2 and next Slip stitch, SC into next stitch covering both the slip stitch and the stitch below. Skip next Slip stitch then SC into top of Chain 2.   Repeat from * 5 times. Slip Stitch into first stitch with Color 3 and tie off. 


Weave in the ends and voila!
 There are a bunch of ideas floating around in my head about how I'd like to use this...You may see some soon in my shop :) What would you do with them?


Monday, October 29, 2012

First Two Etsy Sales!

To my great pleasure and suprise The Sutton has become quite the hit. After creating it at the request of Sutton's mama, two orders were placed for it in color variations.

Here is my very first order!  The Sutton in Purple and Yellow for the Vikings now belongs to Joey in Minnesota.  She got a bonus headband with flower! 


And here's Carter rocking the Orange and Navy in the pumpkin patch!  I think I need to add this photo to Etsy! 

 
 It look's like we're in business!! 

Friday, September 14, 2012

Penny's Hat

 
This beautiful little girl's mommy commissioned a hat for her and left me a lot leeway for artistic discretion.  The mission: create a hat with a deep red flower with an off white/creamy tan for the main body.  I am quite happy with how this turned out!  In additon, my little man was excited that he didn't have to model this one (don't let the gorgeous blue eyes fool you, it's not my son in the picture).
 
First things first--go get some wool.  Michael's is great because they have a teacher discount you can use (well if you're a teacher) along with their rewards.  15% off makes a difference.  This hat is made of my favorite yarn, which just happened to be on sale, Vanna's Choice.  It is soft but sturdy. 
 
Previously all the hats I'd made like this had three colors.  Threes just seem to look more complete.  I love purple, so first I tried adding a purple in there.  Though I liked it, I suddenly panicked, wondering, "What if she hates purple?"  I adore purple by I have a friend who absolutely hates it.  Hoping that Becky liked purple would not suffice, I had to make another hat just in case purple was the bane of her existence! 

Pic the hubby took of the hat with purple. We've got a bet going, he thinks he can sell it faster than I can!


This time only the colors specifically mentioned would be used. I modified the pattern a bit so there would only be two rows of color. The thinner band of color achieved a more feminine look.
   
Then lightning stuck!  A little light bulb went off when I had the idea to add green leaves. I created a simple leaf pattern (which will be shared on this blog for free very soon). Isn't it perfect!  If I ever am blessed with a baby girl, you can bet this will be the first hat I make her.
 
Penny presented a special challenge because her head is a little bigger than average (although no one would ever notice, her mommy told me she has a tough time getting some shirts over her head).  A simple sizing adjustment was made by adding one stitch to the very first round and as you can see, it fits perfectly!


Tuesday, August 21, 2012

Kent State Hats for Little Fans!


My dad's cousin's wife, aka Aunt Becky recently comissioned me to create something for her
daughter's field hockey coach's daughters.  Could I use more apostrophes in a sentence? Anyway,  Alyssa plays field hockey at Kent State, so whatever I made had to be blue and yellow with a little white in the mix and it had to be something they could wear to games.  Immediately this pin came to mind.
Source: craftsy.com via Cheryl on Pinterest

Now if you know one thing about me you know I do not spend money on patterns.  I either look at the pic and figure it out or I find something close and alter it until I am happy with the results.  So of course through trial and error, I ended up making 3 hats.  My husband is constantly losing hiding misplacing the good camera so please forgive the poor image quality.  From left to right, they are size 0-3 months, 2T, and 6-9 months. 


What a perfect combination of school spirit and feminity!

My first source to hit up was ravelry.com where I found a pattern for the earflap hat.  It was a double crocheted pattern and it was easy.  I changed the striped part to half double crochet to make the color appear more vibrant. 

Next I needed a rose.  Coincidently I'd just started making roses for headbands that will be on my Etsy page (currently in development).  There will be a post about my tweaks later but here is the original pattern. 


The basic plan was in place but I had to have the perfect yarn in the perfect colors!  Since these hats were for little ones I was really picky about yarn.  All the colors I needed were already in my stock, but it was Red Heart SuperSaver Yarn. Don't get me wrong, it's a great basic, sturdy yarn, but being a mother, I want something very soft for my little one's head, which carries over to my projects.  Luckily, I had a 20% off coupon for Michael's AND some of my favorite yarn was on sale!!  (I know, I know, you can get wool cheap on the internet, but the crafter in me needs to touch and feel the yarn to make the selection).  Vanna's Choice is my go to yarn for softness, unfortunately they did not have--or my Michael's did not carry-- the vibrant blue that I wanted.  On to Loops and Threads Impeccable Yarn, SCORE, it was also on sale and had exactly the colors I wanted! 

Finally I cut 3 lengths of yarn in each color, looped it through the bottom of the earflap, then braided it. Voila!
 
Here's my son, the not-so-cooperative model.  My brother the budding photographer photographed him for me.