Showing posts with label winter hats. Show all posts

Tuesday, August 19, 2014

Crochet for Cancer: Free Beanie Pattern

As part of our One Book-One School Initiative, we read The Fault in Our Stars. Our school will be doing various activities centered around the book.  I was approached to help student crochet items to donate to cancer patients.  This led me to discover a charity called Crochet for Cancer.  I wrote this basic pattern (which I actually use as the base for many of the patterns in my shop) to share with my students.

I've decided to share it with the community at large in hopes that it will be used for more donations.  If you use this pattern for hats you sell, please give me credit and provide a link to this pattern.  

If you choose to donate caps, guidelines are proved here along with contact information for making your donation.  They also have a large collection of free chemo cap patterns.

Erma’s Inspiration Basic Double Crochet Beanie for all sizes

Size
Height in inches
Circumference in inches
Newborn (0-3 months)
5.5-6
12-15
3-6 months
6.5-7
14-17
6-12 Months
6.5-7.5
16-19
Toddler
8
18-20
Child
8.5
19-20.5
Teen/Adult Female
9-10
21.5-22.5
Teen/Adult Male
10
23-24                          
Supplies
H-Hook
Worsted Weight Yarn

Abbreviations
DC- double crochet
SC- Single Crochet
CH-chain
SL ST- Slipstitch
STS- stitches


1.        Begin by making a magic circle.  Chain 3, 10 DC in ring. Pull magic ring tight SL ST into top of CH 3 (10 STS)
a.       There are tutorials on YouTube for a magic ring if you are unfamiliar or you can:
CH 4.  SL ST into 1st CH.  CH3, DC 10 in ring, SLST into top of CH 3
Here's a tutorial for the Magic Circle using Double Crochet, this tutorial is a little better             BUT she is using single crochet
2.       CH3, 2 DC in each DC.  SL ST into top of CH 3 (20 STS)
3.       CH 3. [2 DC in next DC, DC in next DC] repeat to end. SL ST into top of CH 3  (30 STS)
4.       CH 3. [2 DC in next DC, DC in next 2 DC] repeat to end. SL ST into top of CH 3 (40 STS) For Newborn size skip to #9
5.       CH 3. [2 DC in next DC, DC in next 3 DC] repeat to end. SL ST into top of CH 3  (50 STS) For 6-12 month skip to step #9
****FOR 3-6 MONTH SIZE ONLY CH 3 [2 DC  in next SC, DC in next  9DC] repeat to end. SL ST into top of CH 3.  (55 STS) skip to step #9****
6.       CH 3. [2 DC in next DC, DC in next 4 DC] repeat to end. SL ST into top of CH 3 (60 STS) for Toddler size skip to step #9
****FOR CHILD SIZE ONLY CH 3. [2 DC in next DC, DC in next 11 DC] repeat to end. SL ST into top of CH 3 (65 STS) skip to step #9****
7.       CH 3. [2 DC in next DC, DC in next 5 DC] repeat to end. SL ST into top of CH 3 (70 STS)  for Teen/Adult Female size skip to step #9
8.       CH 3. [2 DC in next DC, DC in next 13 DC] repeat to end. SL ST into top of CH 3 (75 STS) (Only for Teen/Adult Male)
9.       CH3, DC in each DC around. SL ST into top of CH 3. Repeat until the proper number of rows is achieved. 
a.       For Newborn- repeat 6 times  for a total of 10 rows
b.      For 3-6  months-repeat for a total of 11 rows
c.       For 6-12 months- repeat 7 times for a total of 12 rows
d.      For Toddlers- repeat 7 times for a total of 13 rows
e.      For Children- repeat 7  times for a total of 14 rows
f.        For Teen/Adult Females- repeat 8 times for a total of 15 rows
g.       For Teen/Adult Males- repeat 8 times for a total of 16 rows
*always measure to make sure your hat falls into the proper size range. See Size chart at the top of pattern

10.   CH 1.  SC in each DC around. SLST into CH1.  Tie off and weave in ends.

Optional: Change colors during row changes for stripes.  Embellish with appliques.  

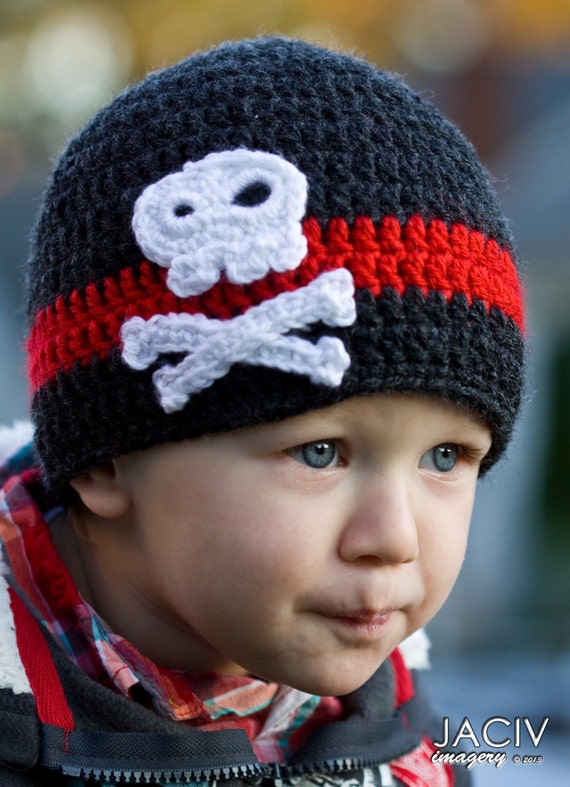
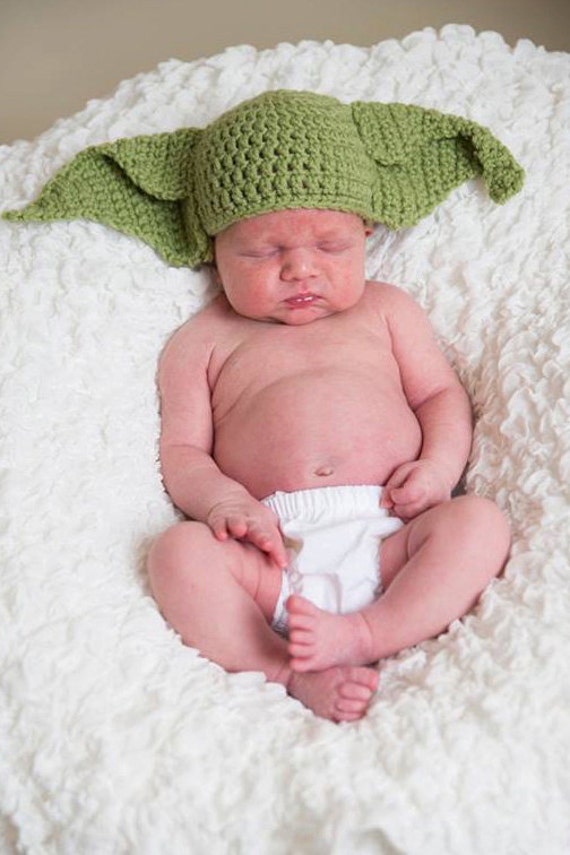
Here are some examples of hats I've created using this pattern: 


Sunday, December 29, 2013

Abby Cadabby and Cookie Monster Custom Hats

I was recently asked if I could make hats for a friend's children when they go to Sesame Place in the winter.  Because I generally believe I can do anything when it comes to crocheting, I said yes.  This is one where I really had no idea what I was in for!  Before I go on, here is a picture of the finished projects.  Abby is for a 2 year old girl and Cookie Monster is for a 6 month old boy.  
 I did a little research on the internet before I began and sent a few links to my patron.  We discussed features she liked of each and I made my own pattern.  After shopping for the perfect colors to use, I started working on the bases and went from there.  

Abby was a lot more work than I anticipated.  She requires several pieces and LOTs of color!
She includes a nose, blue eyes with blue "eye-shadow" and hand stitched eyelashes, ears, daisy hair ties, and of course the hair!  The colors I found for her hair are awesome, really the picture doesn't do it justice.  They are Shimmer yarn by Red Heart and they have colored sparkles that run throughout, perfect for a fairy!  I had to learn how to wig a crochet hat.  This free tutorial download was quite helpful, though not perfectly specified or aligned to how I made this hat, but with some common sense and experimentation, I was able to adapt it.  Then Abby got her hair done!  This was the first time I cut hair on a hat!!  

Cookie Monster was a lot easier, though he had his fair share of parts: googly eyes, mouth, and who could leave off some chocolate chip cookies with bites taken out of them!

These hats are not yet available for purchase in my shop, but I would gladly take a custom order.   I will be listing them after my next photoshoot.  

Saturday, March 2, 2013

Happy Birthday Dr. Seuss and some odds and ends...

The last few months have been jam packed with holidays, end of semester and start of new semester craziness, and sickness that brought my entire extended family to their knees, including me (I haven't been seriously ill since 2009!).

I've had a few recent commissions that I wanted to share.  Here's the first twin set I created which happens to coincide with Dr. Suess's birthday.  These went to some very special babies in New Hampshire.


And here is a newborn version of my Girly Penguin Earflap hat that headed up to Massachusetts on Monday.
 Here is the hat for the hippest baby on the block.  If there are any teenagers in your life, you'll recognize that these are my spin on Beats headphones which are quite the status symbol!  One of my students commission and helped me design this hat for her cousin!  Oh, and its not my dyslexia kicking in, the "b" is upside down because these were made for a little guy named Patrick, so we swapped the "b" for a "p" to personalize them.
  Lastly (which I failed to notice until today due to the crazy month I had in February), Kate Nesi has some of my work featured on a little guy in her blog.

Saturday, November 24, 2012

Result of the Sibling Collaboration Experiment

Well this is going to be difficult.  I want to share SOOOOOOOO many images.  I seriously think blogger would crash! 

For a first time event, we're calling it a successs. John snapped gorgeous photos of all my new hats.  I had 2 friends who participated (there were supposed to be 3 but one of the babies got sick). Plus my son who hates modeling but seemed to enjoy having some company. 

I'm hoping to do it again someday.  I'll have to make even more new designs though!

Without further ado, here are our outstanding photos.

Out Takes


Do I hafta smile Uncle John???
 

"No, I didn't try to pull that off, my head is just odd shaped"


Well, ya know this isn't the easiest place to sit ladylike, but I'll make it work. 

Mommies make us SMILE!


Reindeer!


At this point blogger can't handle all the pictures and I've lost the ability to add captions :( A picture's worth a thousand words anyway!


Penguins!


What a little beauty!


Kids being kids :)

 Time to slide!!